Kubernetes networking: network namespace, veth pair and bridge
Kubernetes guarantees that each pod in the cluster has a unique IP address, and they can can communicate with each other using this IP address directly. You may wonder how this is achieved. We will have a series of posts that will explain how networking works in Kubernetes. And this is the first post in the series, which will explain three fundamental concepts: network namespace, veth, and bridge, that are the building blocks of Kubernetes (and container) networking.
In this post, we limit the discussion to the Linux networking, without considering the networking in other operating systems.
What are network namespaces?
Network namespace can be considered as the backbone of container/Kubernetes networking. As its name suggests, namespace separate resources of a Linux system into multiple abstract isolated spaces. The network namespace isolates the network stack, including network devices, IP addresses, routing tables, etc. Each network namespace has its own network stack, and processes in different network namespaces cannot see each other’s network stack.
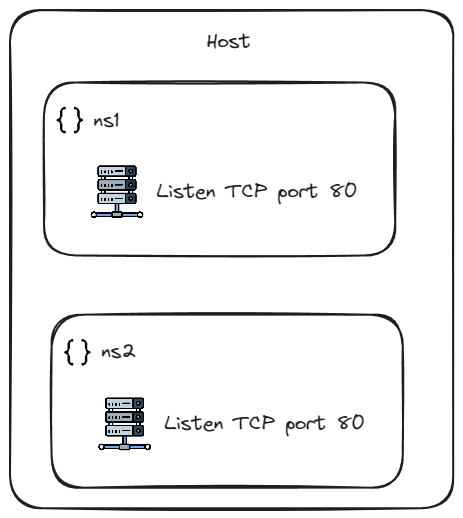
A straight example is that in two separate network namespaces on same host, program can listen on the same port without conflict, as shown in figure below.

Network namespace can be created using the “clone()” system call with the “CLONE_NEWNET” flag. The ip command in the iproute2 package provides a convenient way of creating and managing network namespaces using the clone system call. In this post, we will use the ip command to create network namespaces.
A network namespace can be created by
# Create a network namespace named ns1
$ sudo ip netns add ns1

# List the network namespaces
$ sudo ip netns list
ns1
There will be a mount point /var/run/netns/ns1 created when the network namespace ns1 is created. The mount point exists for two reasons:
- It ease the network namespace management.
- It allows the network namespace to exist even there is no process running in it.
After a network namespace is created, we can use the ip netns exec command to execute a command in that namespace. The following command lists the network devices in the network namespace ns1. As you can see, the network namespace ns1 has only the loopback interface lo.
# Check the network devices in ns1
$ sudo ip netns exec ns1 ip link show
1: lo: <LOOPBACK> mtu 65536 qdisc noop state DOWN mode DEFAULT group default qlen 1000
    link/loopback 00:00:00:00:00:00 brd 00:00:00:00:00:00
As you may have noticed, the loopback interface lo is DOWN. Thus when we are trying to ping it, it will fail.
# Ping the loopback interface in ns1
$ sudo ip netns exec ns1 ping 127.0.0.1
ping: connect: Network is unreachable
This can be fixed by set the loopback interface lo up in the network namespace ns1.
# Set the loopback interface lo up in ns1
$ sudo ip netns exec ns1 ip link set lo up

# Ping the loopback interface in ns1
$ sudo ip netns exec ns1 ping 127.0.0.1
PING 127.0.0.1 (127.0.0.1) 56(84) bytes of data.
64 bytes from 127.0.0.1: icmp_seq=1 ttl=64 time=0.015 ms
64 bytes from 127.0.0.1: icmp_seq=2 ttl=64 time=0.054 ms
64 bytes from 127.0.0.1: icmp_seq=3 ttl=64 time=0.052 ms
Before we move on to the next section, let’s create another network namespace ns2.
# Create a network namespace named ns2
$ sudo ip netns add ns2

# List the network namespaces
$ sudo ip netns list
ns2
ns1
What are veth parirs?
veth is short for “virtual Ethernet”. A veth pair is a pair of virtual network devices that are connected to each other. When a packet is sent to one end of the veth pair, it will be received by the other end. veth pairs are often used to connect network namespaces to the host network namespace or to connect two network namespaces.
A veth pair can be created using the ip command. The following command creates a veth pair named veth1 and veth2.
# Create a veth pair veth1 and veth2
$ sudo ip link add veth1 type veth peer name veth2

# Set them up
$ sudo ip link set veth1 up
$ sudo ip link set veth2 up

# List the network devices
$ sudo ip link show
1: lo: <LOOPBACK,UP,LOWER_UP> mtu 65536 qdisc noqueue state UNKNOWN mode DEFAULT group default qlen 1000
    link/loopback 00:00:00:00:00:00 brd 00:00:00:00:00:00
2: eth0: <BROADCAST,MULTICAST,UP,LOWER_UP> mtu 1500 qdisc mq state UP mode DEFAULT group default qlen 1000
    link/ether 00:15:5d:47:1d:09 brd ff:ff:ff:ff:ff:ff
3: veth2@veth1: <BROADCAST,MULTICAST,M-DOWN> mtu 1500 qdisc noop state UP mode DEFAULT group default qlen 1000
    link/ether 2e:a0:5d:4a:ff:85 brd ff:ff:ff:ff:ff:ff
4: veth1@veth2: <BROADCAST,MULTICAST,M-DOWN> mtu 1500 qdisc noop state UP mode DEFAULT group default qlen 1000
    link/ether 86:0a:10:be:06:59 brd ff:ff:ff:ff:ff:ff
By default, the veth pairs are created in the default (host) namespace. We can move them to the network namespaces ns1 and ns2 respectively.
# Move veth1 to ns1
$ sudo ip link set veth1 netns ns1

# Check the network devices in ns1
sudo ip netns exec ns1 ip link show
1: lo: <LOOPBACK,UP,LOWER_UP> mtu 65536 qdisc noqueue state UNKNOWN mode DEFAULT group default qlen 1000
    link/loopback 00:00:00:00:00:00 brd 00:00:00:00:00:00
4: veth1@if3: <BROADCAST,MULTICAST> mtu 1500 qdisc noop state DOWN mode DEFAULT group default qlen 1000
    link/ether 86:0a:10:be:06:59 brd ff:ff:ff:ff:ff:ff link-netns ns2

# Move veth2 to ns2
$ sudo ip link set veth2 netns ns2

# Check the network devices in ns2
$ sudo ip netns exec ns2 ip link show
1: lo: <LOOPBACK> mtu 65536 qdisc noop state DOWN mode DEFAULT group default qlen 1000
    link/loopback 00:00:00:00:00:00 brd 00:00:00:00:00:00
3: veth2@if4: <BROADCAST,MULTICAST> mtu 1500 qdisc noop state DOWN mode DEFAULT group default qlen 1000
    link/ether 2e:a0:5d:4a:ff:85 brd ff:ff:ff:ff:ff:ff link-netns ns1
After the configuration above, the network architecture looks like the following figure.

We can assign IP address to the veth pairs in their respective network namespaces.
# Assign IP address to veth1 in ns1
$ sudo ip netns exec ns1 ip addr add 10.0.0.1/24 dev veth1 && sudo ip netns exec ns1 ip link set dev veth1 up

# Assign IP address to veth2 in ns2
$ sudo ip netns exec ns2 ip addr add
From now on, the network namespace ns1 and ns2 can communicate with each other using the IP address assigned to the veth pairs.
# Ping from ns1 to ns2
$ sudo ip netns exec ns1 ping 10.0.0.2
PING 10.0.0.2 (10.0.0.2) 56(84) bytes of data.
64 bytes from 10.0.0.2: icmp_seq=1 ttl=64 time=0.026 ms
64 bytes from 10.0.0.2: icmp_seq=2 ttl=64 time=0.028 ms
So far, we have explained the network namespace and veth pair, and successfully connected two network namespaces. But what if there are more than two network namespaces? Should we create a veth pair for each pair of network namespaces? No, that’s too cumbersome and unelgant. We can use a bridge to connect multiple network namespaces instead.
Before moving forward, let’s clean the network namespaces and veth pairs created so far.
# Clean the network namespaces
$ sudo ip netns del ns1
$ sudo ip netns del ns2

# Clean the veth pairs
$ sudo ip link del veth1
$ sudo ip link del veth2
What is a bridge?
A bridge is a software component in the Linux kernel that simulates a network layer 2 switch. It can connect multiple network interfaces and forward packets between them, just like a “bridge”. It worth to note that a bridge cannot connect network interfaces on different hosts.
A bridge can be created using the brctl command in bridge-utils package. The following command creates a bridge named br0.
# Create a bridge named br0
$ sudo brctl addbr br0

# Show the bridges
$ sudo brctl show
bridge name     bridge id               STP enabled     interfaces
br0             8000.1293e0c6f4b0       no

# The bridge can be found in ip link show command as well
$ sudo ip link show
1: lo: <LOOPBACK,UP,LOWER_UP> mtu 65536 qdisc noqueue state UNKNOWN mode DEFAULT group default qlen 1000
    link/loopback 00:00:00:00:00:00 brd 00:00:00:00:00:00
2: eth0: <BROADCAST,MULTICAST,UP,LOWER_UP> mtu 1500 qdisc mq state UP mode DEFAULT group default qlen 1000
    link/ether 00:15:5d:47:1d:09 brd ff:ff:ff:ff:ff:ff
5: br0: <BROADCAST,MULTICAST> mtu 1500 qdisc noop state DOWN mode DEFAULT group default qlen 1000
    link/ether 12:93:e0:c6:f4:b0 brd ff:ff:ff:ff:ff:ff

# Turn on the bridge br0
$ sudo ip link set dev br0 up
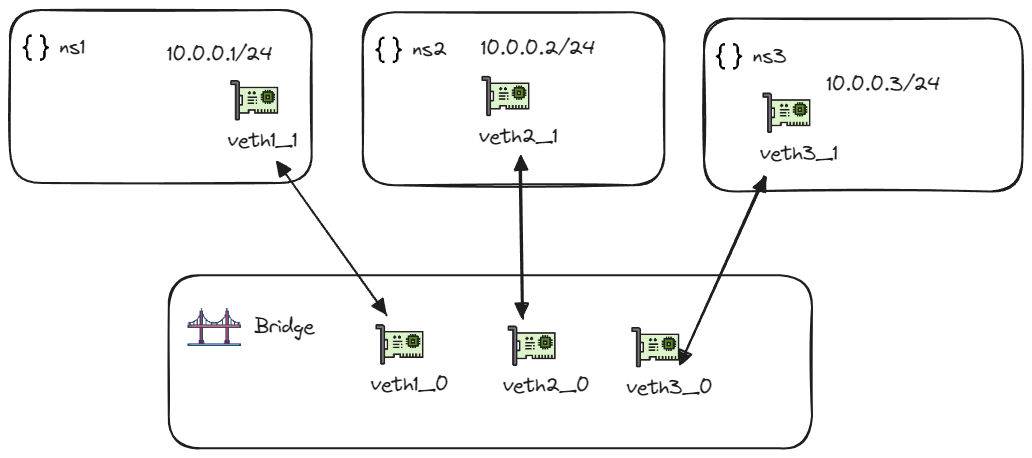
Let’s create 3 new network namespaces ns1, ns2, and ns3, with 3 new veth pairs veth1_0, veth1_1, veth2_0, veth2_1, and veth3_0, veth3_1. We will insert the veth1_0, veth2_0, and veth3_0 into the bridge br0, and insert the veth1_1, veth2_1, and veth3_1 into the network namespaces ns1, ns2, and ns3 respectively.
# Create network namespaces
$ sudo ip netns add ns1
$ sudo ip netns add ns2
$ sudo ip netns add ns3

# Create veth pairs
$ sudo ip link add veth1_0 type veth peer name veth1_1
$ sudo ip link add veth2_0 type veth peer name veth2_1
$ sudo ip link add veth3_0 type veth peer name veth3_1

# Set them up
$ sudo ip link set veth1_0 up
$ sudo ip link set veth1_1 up
$ sudo ip link set veth2_0 up
$ sudo ip link set veth2_1 up
$ sudo ip link set veth3_0 up
$ sudo ip link set veth3_1 up

# Insert veth1_0, veth2_0, and veth3_0 into the bridge br0
$ sudo brctl addif br0 veth1_0
$ sudo brctl addif br0 veth2_0
$ sudo brctl addif br0 veth3_0

# Move veth1_1, veth2_1, and veth3_1 to ns1, ns2, and ns3 respectively
$ sudo ip link set veth1_1 netns ns1
$ sudo ip link set veth2_1 netns ns2
$ sudo ip link set veth3_1 netns ns3
```bash

Then we add the IP address to th veth in the network namespaces.

```bash
# Assign IP address to veth1_1 in ns1
$ sudo ip netns exec ns1 ip addr add 10.0.0.1/24 dev veth1_1
$ sudo ip netns exec ns1 ip link set dev veth1_1 up

# Assign IP address to veth2_1 in ns2
$ sudo ip netns exec ns2 ip addr add 10.0.0.2/24 dev veth2_1
$ sudo ip netns exec ns2 ip link set dev veth2_1 up

# Assign IP address to veth3_1 in ns3
$ sudo ip netns exec ns3 ip addr add 10.0.0.3/24 dev veth3_1
$ sudo ip netns exec ns3 ip link set dev veth3_1 up
Now the network architecture looks like the following figure.

Then we can verify the connection between the network namespaces.
# Ping from ns1 to ns2
$ sudo ip netns exec ns1 ping 10.0.0.2
PING 10.0.0.2 (10.0.0.2) 56(84) bytes of data.
64 bytes from 10.0.0.2: icmp_seq=1 ttl=64 time=0.046 ms
64 bytes from 10.0.0.2: icmp_seq=2 ttl=64 time=0.072 ms
64 bytes from 10.0.0.2: icmp_seq=3 ttl=64 time=0.073 ms

# Ping from ns1 to ns3
$ sudo ip netns exec ns1 ping 10.0.0.3
PING 10.0.0.3 (10.0.0.3) 56(84) bytes of data.
64 bytes from 10.0.0.3: icmp_seq=1 ttl=64 time=0.044 ms
64 bytes from 10.0.0.3: icmp_seq=2 ttl=64 time=0.076 ms
64 bytes from 10.0.0.3: icmp_seq=3 ttl=64 time=0.076 ms

# Ping from ns2 to ns3
$ sudo ip netns exec ns2 ping 10.0.0.3
PING 10.0.0.3 (10.0.0.3) 56(84) bytes of data.
64 bytes from 10.0.0.3: icmp_seq=1 ttl=64 time=0.039 ms
64 bytes from 10.0.0.3: icmp_seq=2 ttl=64 time=0.072 ms
64 bytes from 10.0.0.3: icmp_seq=3 ttl=64 time=0.067 ms
Cool! We have successfully connected three network namespaces using a bridge! This is the end of the post, and we have explained the fundamental concepts involved in Kubernetes networking, including network namespace, veth, and bridge. The resources created can be cleaned by
# Clean the network namespaces
$ sudo ip netns del ns1
$ sudo ip netns del ns2
$ sudo ip netns del ns3

# Clean the bridge
$ sudo ip link set dev br0 down
$ sudo brctl delbr br0
What’s next?
In the future posts, we will explain how Kubernetes networking works, including the CNI plugin, kube-proxy, and the service discovery mechanism. Stay tuned!